
jueves, 29 de septiembre de 2011
! Felicidades Mafalda !
Hoy cumple 47 años este cómic tan leído y que disfrutamos tanto. Fue el 29 de septiembre de 1964 que salió la primera publicación de Mafalda creada por Quino. Es lindo recordar viejos tiempos...
miércoles, 28 de septiembre de 2011
Presenting "Yvi"
Presentando a Ivy

http://elartederosia.blogspot.com.
The last thing for now is giving the credit for this cute girl doll.
The e-pattern I used was from:
http://www.homespunfromtheheart
I won this pattern in a giveaway that Cindy made in her blog. I change the hair a little and dressed the doll with a normal dress because in the pattern she came dressed like a witch. Halloween has not arrived my home yet, I think soon will be

Esta pequeña niña ya tiene nombre gracias a una amiga bloguera que me hizo la sugerencia. Gracias Rose Marie, me encanto tu elección. Si quieren visitar su blog para conocer sus lindos trabajos es:
http://elartederosia.blogspot.com.
Para terminar quiero dar los créditos de esta linda nena. Es un patrón de:
http://www.homespunfromtheheart
Me gane el patron en un giveaway que hizo Cindy en su blog. Modifique el pelo un poco y la vestí a mi gusto ya que en el patrón venia vestida de brujita. Halloween no ha llegado a mi casa todavía, pero que pronto lo hará.
martes, 27 de septiembre de 2011
Raggedy dolls
Now they have hair...and loons!!!
Aren't they lovely?
Now I have to name them.
Any suggestions?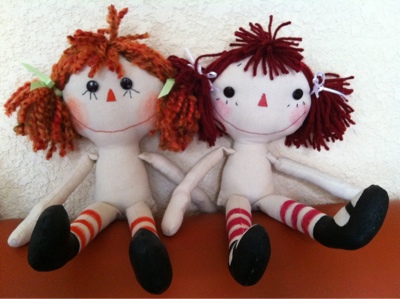
 Ya tienen pelo... Y calzoncitos.
A poco no están lindas!!
Ahora a buscarles nombre.
Sugerencias?
Ya tienen pelo... Y calzoncitos.
A poco no están lindas!!
Ahora a buscarles nombre.
Sugerencias?
Aren't they lovely?
Now I have to name them.
Any suggestions?
lunes, 26 de septiembre de 2011
Raggedy dolls almost ready
Otras muñecas Raggedy casi listas.
I'm very happy with this small raggedies.
I already painted the shoes and the face is embroidered with red and black thread and the eyes are black buttons.
Both dolls are going to be presents for very especial people.
Maybe I finish them tomorrow ...
Estoy muy contenta con estas
pequeñas Raggedies.
Ya les pinte los zapatitos, y la cara esta bordada con hilos rojo y negro, los ojitos son botones negros.
Ambas muñecas van a ser regalos para gente muy especial.
SAL Clueless Witch
SAL BRUJA DESDPISTADA

Hi, here we can find what are we going to need.
It starts on October 1.
The call remains open, you have time to sign in if you like this little witch.
Hola, aqui pueden encontrar los materiales que vamos a necesitar. Empieza el 1 de Octubre.
La convocatoria sigue abierta si deseas participar.
http://ratondemadera.blogspot.com/2011/09/sal-bruja-despistada_25.html
New Patchwork Sal
Nuevo Sal de Patchwork
Hi everyone here's a new Sal I have just sign in. Is just beautiful.
Here is the link:
Hola a todas aquí hay un Sal simplemente bello, por si quieren apuntarse.
Les dejo el link por si quieren pasar
http://olgadomnguezpatch.blogspot.com/2011/09/nuevo-sal.html

Hi everyone here's a new Sal I have just sign in. Is just beautiful.
Here is the link:
Hola a todas aquí hay un Sal simplemente bello, por si quieren apuntarse.
Les dejo el link por si quieren pasar
http://olgadomnguezpatch.blogspot.com/2011/09/nuevo-sal.html

domingo, 25 de septiembre de 2011
Weekend at the beach
Just arriving from Chelem, a beautiful beach at only 35 minutes from Merida.
It was such a beatiful day, swimming, doing sand castles with the nephews, eating yummy fish and the most important thing: enjoying the family.


It was such a beatiful day, swimming, doing sand castles with the nephews, eating yummy fish and the most important thing: enjoying the family.
martes, 20 de septiembre de 2011
Spring Rolls Recipe
Receta de Rollos Primavera
Saludos, como me han pedido la receta de los rollos de los que comente en la entrada de ayer, aquí les va. Espero darme a entender bien ya que es la primera receta que publico.1 1/2 taza de arroz ( yo use del normal, me dicen mis hijos que debe ser arroz especial para sushi, pero no lo halle en el super)
200 gr de camarones pequeños cocidos
1 aguacate
1 pepino
2 paquetes de queso philadelphia de 190 gr
1 paquete de algas deshidratadas
1/2 taza vinagre de manzana
2 o 3 cdas de azúcar
Tapete de bambú para sushi

COCER EL ARROZ
Yo cocí el arroz como siempre, 3 tazas de agua por cada taza de arroz, le puse sal y una pizca de azúcar.
Mientras se esta cociendo puse a calentar el vinagre con el azúcar hasta que se disolvió todo el azúcar.Ya cocido el arroz y apagada la estufa le revolví el vinagre con cuidado para no empelotar mucho el arroz. Según, esto le da la consistencia para que no se desbaraten los rollos. Si fuera el arroz especial para sushi no sería necesario este paso.
FORMAR LOS ROLLOS
Yo forré el tapetito con una bolsa de plástico para hacer mas fácil su limpieza después de usar. Después solo tiras la bolsa y ya no hay que batallar limpiando entre los palitos del tapete.Primero coloqué una capa de arroz sobre el tapete, calculando que sea del tamaño del alga. Hay que apretarlo bien con las manos sobre el tapete.
Luego se coloca el alga sobre el arroz y la hidrato mojando mis manos con agua y pasándolas sobre el alga, enseguida se ve que se empieza a contraer, no hay que mojarla demasiado solo apenas.
Después coloco filas del aguacate en tiras, del pepino, el queso y los camarones. en el sentido en que van los palitos del tapete, porque asi los vamos a enrollar.
Ahora los vamos a ir enrollando poco a poco con el tapete, en este punto no aprieto mucho aún, solo lo voy girando y voy acomodando todos los ingredientes para que vayan
quedando dentro del rollo.
Ya que se hizo el rollo,( hay que fijarse que lo ultimo que enrolles sea puro arroz para que quede bien cerrado el rollo) ya puedes empezar a apretarlo y compactarlo para que lo puedas rebanar y comer con palillos si es tu gusto sin que se desbarate.
Ya bien apretado lo levanto y lo pongo en una charola en el refri, tapado con un paño ligeramente húmedo. Como lo he apretado bien este paso no me ha costado ningún trabajo.
A la hora de servir se saca del refri y se corta en rebanadas como de 2 cm de grueso.
Se acompañan con salsa de soya y salsa agridulce.
Espero les sirva y les gusten, mis hijos que son comensales exigentes los aprobaron 100%.

SPRING ROLLS
INGREDIENTS
1 1 / 2 cup rice (I use normal, my children say that it has to be special rice for sushi, but I didn't find it).
200 gr cooked small shrimp
1 avocado
1 cucumber
2 packages of cream cheese 190gr
1 package of dried seaweed
1 / 2 cup cider vinegar
2 or 3 tablespoons sugar
Bamboo sushi mat
COOKING THE RICE
I cooked the rice as usual, 3 cups of water for each cup of rice, I put salt and a pinch of sugar.
Meanwhile I heat the vinegar with the sugar until it dissolves.
When the rice was finish I stir it with the vinegar very carefully. This gives the consistency to the rice for making the rolls easier.
MAKING THE ROLLS
I line the mat with a plastic bag to make it easier to clean after use. Then, just throw the bag.
First I put a layer of rice on the table, figuring that is the size of the seaweed. You have to squeeze it with your hands on the table.
Then put the seaweed over the rice and moisten your hands in water and pass them on the seaweed to hidrate it.
After that put rows of avocado, cucumber, cheese and shrimp.
Now you will go rolling slowly over the mat, at this point you don't have to press to hard
When the roll is made, you can start to squeeze and compact it so you can slice it properly and eat it with chopsticks if you like without crumbling.
Then I put the rollson a tray in the refrigerator, covered with a damp cloth.
At the time of serving take them out of the fridge and cut it into slices as 2 cm thick.
You can serve it with soy sauce and sweet and sour sauce.
lunes, 19 de septiembre de 2011
Today's Menu: Spring rolls
Menú de hoy: Rollos Primavera
It's great when your kids likes what you spent all morning cooking. I'm learning how to do this "spring rolls" and they just come out very good.
Yeah!!!
Es maravilloso cuando les gusta a tus hijos lo que te pasaste cocinando toda la mañana. Estoy aprendiendo a hacer estos "rollos primavera" y me salieron muy ricos.
Si!!!
One point for the day, the other point is for all the raggedy faces I embroideted today...
Plans for tomorrow: sewing some dolls!!!
Primer punto del día, el otro punto es por las caritas de raggedy que borde hoy...
Planes para mañana: costurar muñecas!!!
sábado, 17 de septiembre de 2011
Sal "Bruja Despistada"
Sal "Clueless Witch"

Hola amigas, para las que les gusta la muñequeria, me inscribí a este Sal del blog Ratón de Madera. Es una brujita preciosa.
Estan a tiempo para inscribirse todavia y así seran muchisimas brujitas y cada una con nuestro toque personal. Será maravilloso verlas todas.
Aqui esta el enlace:
Animense¡¡¡

Hi friends, for those who likes dollmaking, I signed up for this Sal, from Raton de Madera's Blog (wooden mouse blog). It's a beautiful witch.
You're still in time to register and it will be a lot of little witches with our special touch.It will be nice to see them all.
Here's the link:
Go for it¡¡¡
viernes, 16 de septiembre de 2011
"Already thinking about christmas"
"Ya pensando en navidad"


Hi everyone, today I officially started my christmas crafts. Every year I try to make some new ornaments for my christmas tree. This year I want to add some Raggedy Annies on it. So today I painted some wood beads with Annie faces. Then I atatch them some used thread spools to make the bodies. And here is how they look so far.
Hola a todas, Hoy oficialmente empecé mis manualidades navideñas. Todos los años trato de hacer adornos nuevos para mi arbolito. Este año quiero poner unas Raggedy Annies, así que pinte unas cuentas de madera con caritas raggedy, hice unas negritas tambien. Luego les uní unos carretes de hilo usados para formar los cuerpos. Así es como se ven hasta ahora.

I'm thinking that I'm going to do the arms and legs with striped fabric, and the hands with some smaller wood beads.
I'm not sure about the dresses, maybe I use some chritmas fabric with small prints on it or I dress all the raggeddies with different fabrics in different colors and prints. I don't know yet, I'm still thinking...
Estoy pensando hacer los brazos y piernas con tela rayada y las manitas y pies con cuentas de madera mas pequeñas. No estoy segura de los vestidos, a lo mejor uso telas navideñas con estampados pequeñitos, o a lo mejor las visto a todas con telas estampadas de diferentes colores. No sé aún. sigo pensando...

I also assembled some dolls with wooden beads and spools. They are very easy to do as you can see in the photo. And I think that they will look very nice in my christmas tree when I finish dressing them.
Maybe you're thinking, those are a lot, but obviously not all are for me. I always make a few extras to give away to friends and family.
Tambien armé unas muñecas con cuentas y carretes de madera. Son muy fáciles de hacer como pueden ver en la foto. Creo que se van a ver lindas en mi arbolito una vez que termine de vestirlas.
A lo mejor estan pensando que son muchas, obviamente no todas son para mi, siempre hago unas extras para regalar a amigos y familia.

Don't think that I forgot halloween, just yesterday I trace some dolls patterns: a few witches and raggedy witches that only need me sitting in my sewing machine.
Maybe tomorrow... cause I don't have the fabrics yet. I think that after halloween, the stores take out the christmas fabrics.
No crean que me olvide del día de muertos, apenas ayer tracé unos patrones de muñecas: de brujitas y brujitas raggedy, que solo necesitan que me siente frente a la máquina.
A lo mejor mañana... ya que aún no tengo las telas. A lo mejor pasando dia de muertos ya saquen telas de navidad en las tiendas.


miércoles, 14 de septiembre de 2011
Calendario Country


domingo, 11 de septiembre de 2011
"Country Calendar" - September Block"
" Calendario Country"
Cuadro de Septiembre

Rainy september is here, it has been raining amost every day so this were good days to sit and embroider, listening the rain fall.
Septiembre lluvioso está aquí, ha llovido casi todos los dias; así que han sido dias perfectos para sentarnos a bordar mientras oimos la lluvia caer.

Here it is just finished the September Block of the Country Calendar that Julia, Rosy and I have been doing this year. Hi friends¡¡¡
Aquí esta recién terminado, el cuadro de Septiembre del " Calendario Country", que Julia, Rosy y yo hemos estado haciendo este año. Hola amigas¡¡¡

What do you think?
Have a pleasant evening..
Me encantó la canasta de manzanas.
Ustedes que piensan?
Tengan una noche placentera.
Pattern from: www.Elliesquiltplace.com
sábado, 10 de septiembre de 2011
TUTORIAL "Easy Patchwork Coasters"
"Posavasos de Patchwork Fáciles"


It has been a while since I wanted to do this coasters, I saw them in a video on the net, but until you make them, you don't realize how easy to make they are.
Ya tiene un tiempo que quiero hacer estos posavasos, los ví en un video en la red,hasta que no los haces no te das cuenta de lo fácil que es.

1-First you have to cut 6 squares for each coaster, and each square should measure 5 inches. I cut 72 squares because I wanted to do two sets of six coasters each.
Primero tienes que cortar 6 cuadros de 5 pulgadas cada uno para cada portavasos.Yo corte 72 ya que quería hacer dos juegos de 6 posavasos cada uno.

2-Then you have to press the squares by half, making triangles. You need 4 triangles for each coaster.
Entonces hay que planchar los cuadros por mitad formando triángulos, se necesitan 4 triángulos por cada posavaso.
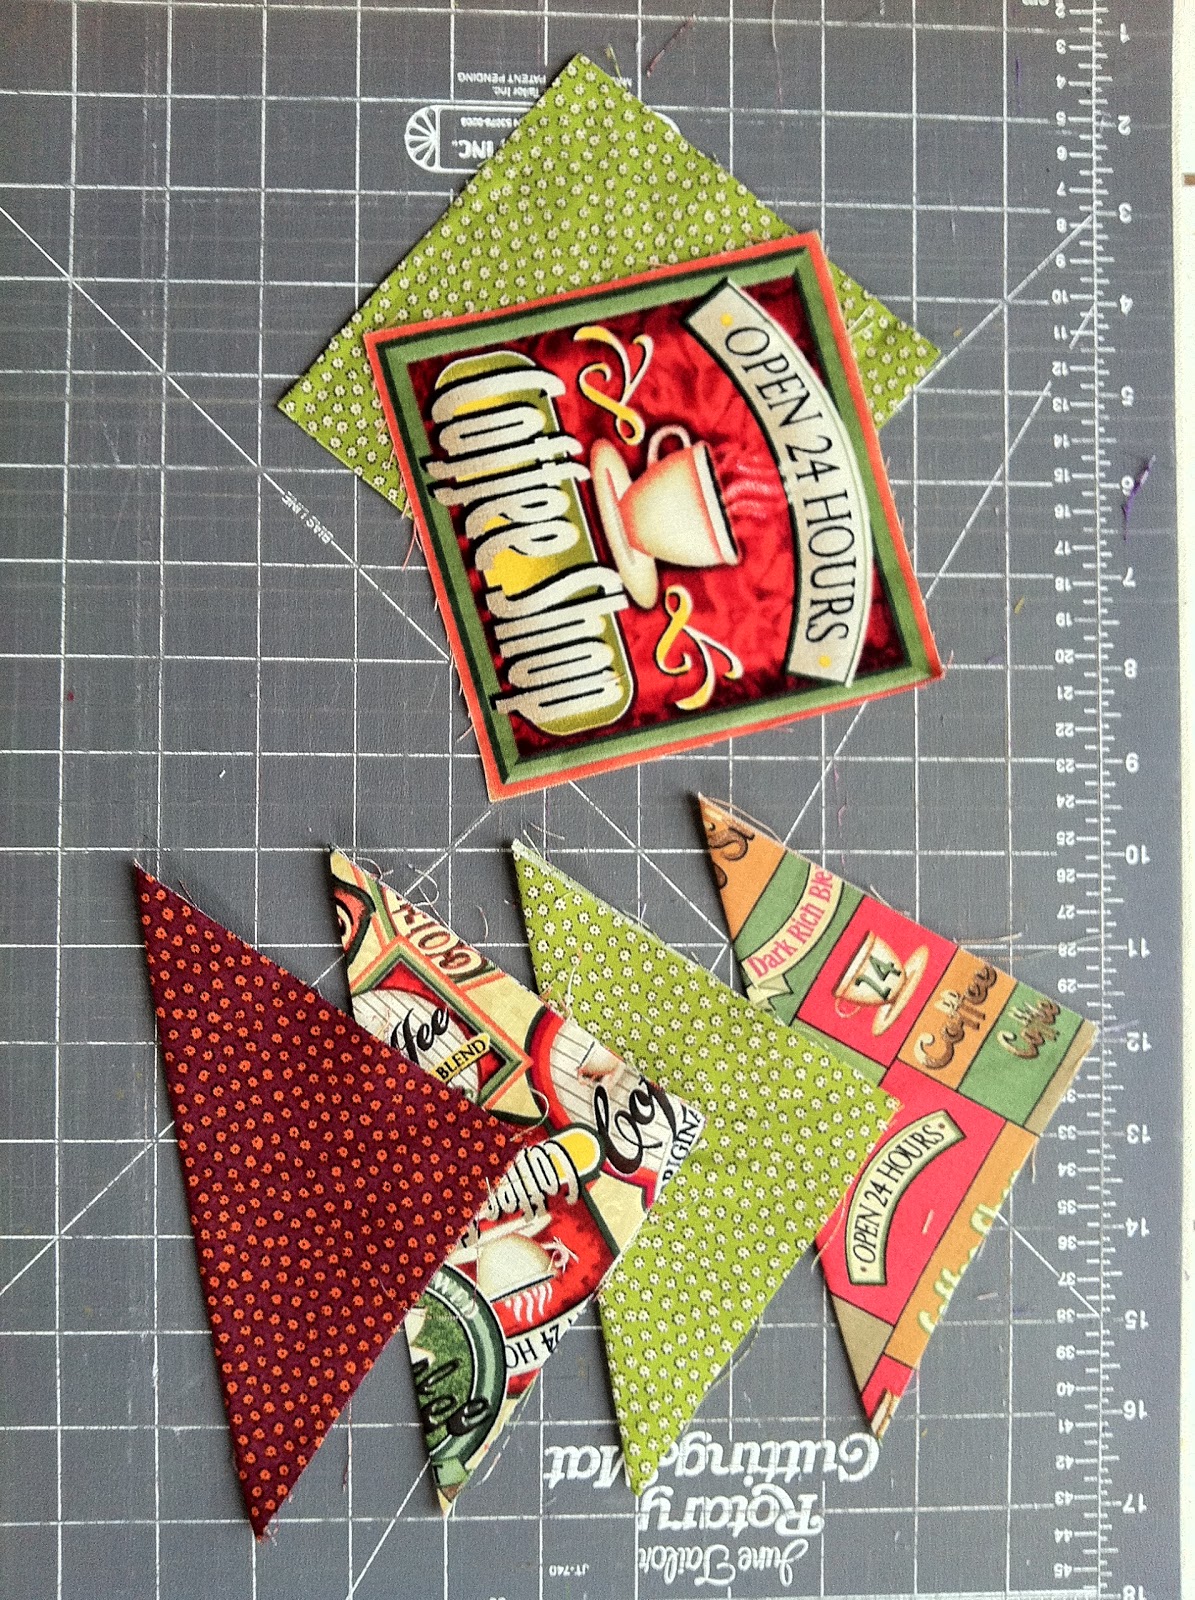
Esta es la parte divertida.Coloca el primer triángulo para empezar.

Coloca el segundo triángulo como muestra la foto. Fijate de alinear los bordes de cada triangulo.

Ahora pon el tercer triángulo.

Esta es la parte dificil: pon el cuarto triángulo;Aqui tienes que levantarlo y poner el primer triángulo sobre el cuarto.

Así es como se debe ver hasta ahora.

Ahora coloca dos cuadros uno contra otro con el revés de la tela encarado.

"Make sure you put the square that you want to be the backside of the coaster between the triangles and the other square".
Ahora colocálos sobre el cuadro que formaste con los triángulos.Fijate de colocar en medio del cuadro y los triángulos el cuadro que quieras que sea la parte trasera o de abajo de tu posavasos.
Ahora colocálos sobre el cuadro que formaste con los triángulos.Fijate de colocar en medio del cuadro y los triángulos el cuadro que quieras que sea la parte trasera o de abajo de tu posavasos.

Puedes alfiletear todas las piezas juntas para facilitar la costura.


12-Now you sew all around with your sewing machine.
Ahora costura todo el contorno del cuadro.

Corta las cuatro esquinas para facilitar el volteado.

Voltéalos al derecho y pasales la plancha.

Muy rápido y fácil.Y se ven lindos.

15- Walaaa¡¡
The coasters are ready.
Here you can see the front view and the back view of them.
Tadaaa¡¡¡
Los posavasos estan listos.Aqui puedes ver como queda el delantero y trasero de los posavasos.
Tadaaa¡¡¡
Los posavasos estan listos.Aqui puedes ver como queda el delantero y trasero de los posavasos.

Tambien puedes hacerlos con rectángulos en vez de triángulos.

Tambien puedes ir acomodando las piezas conforme las vas costurando con la máquina sin necesidad de alfiletear.

I love cups, especially this one that my daugther gave me for my last birthday.
Hice algunos de los posavasos de esa manera y me quedaron bien.
Amo las tazas, especialmente esta que me regaló mi hija Barbie por mi cumpleaños.

Here are the others I made.
They are two sets of six coasters each one.
Estos son los otros que hice. Son dos juegos de 6 posavasos cada uno.
Estos son los otros que hice. Son dos juegos de 6 posavasos cada uno.

Uno para la casa de aqui, en Mérida y el otro para Palenque.

Estoy contenta de que estan listos los dos juegos y además hacen juego con mis individuales.

Espero que este tutorial les sea útil a todas ustedes ya que me encanta compartir este tipo de cosas. Nos vemos pronto...
Suscribirse a:
Entradas (Atom)
Pin it
